How to Paint a Car
If you need to paint your car, consider learning how to paint a car yourself. This is cheaper than paying a car shop to paint your car, and you know exactly how you want the automobile painted. Doing it yourself means avoiding the hassle of making sure someone else does the job to your exact specifications.
While painting a vehicle might seem like a job better left to the professionals, learning how to paint a car yourself has several advantages, besides the ones pointed out above. By painting the car yourself, you complete the project on your own schedule and make sure the car looks exactly as it should. It bears repeating: you also end up save a lot of money.
On the downside, studying how to paint a car and then taking the extraordinary step of painting a vehicle takes a lot of time. With a full time job, you’ll end up spending a lot of time away from the wife and kids at night and on the weekend. If you have no kids or they enjoy spending time around cars, this might not be a problem for you at all.
Car Painting Instructions – Preparation
The importance of preparation when learning how to paint a car cannot be overemphasized. Several hours of work are required before any painting can actually begin.
Our car painting instructions begin with removing the paint. First, strip all of the trim from the vehicle. When I say “trim”, that includes the grill, both bumpers, side view mirrors and license plates.
Next, clean the auto from top to bottom, removing any dirt and grime. Apply wax and grease remover to the body of the car. Apply duct tape to the edges of all windows to keep them clean, in preparation for the next step.
Sand the Paint from the Car
Sand down the old paint. In short, you will need to reduce the car to its original primer or factory paint, before applying your own primer and paint. Try using a dual-action air sander for best results.
If you come across any rust areas, patch them up before you go any further. Cut out the rusted area, if possible. Clean the exposed area thoroughly before applying a patch.
For minor flaws on the surface of the car, use a body filler. Use a plastic spreader to apply filler evenly over the surface. When the filler is almost hardened, smooth the top with a knife and cut out any excess filler.
Use acrylic glazing compound over the section covered by the filler to give it a smooth, professional looking surface. Skipping this step could result in tiny bubbles forming over the top of the filler. The final step in sanding your card is to sand down the glaze.
Masking the Vehicle

How to Paint a Car
In the event you want to mask any areas on the body of the car, consider using a type of soft-edged foam tape that won’t damage the vehicle. Areas of concern to focus on include those where you’re painting a special design such as racing stripes.
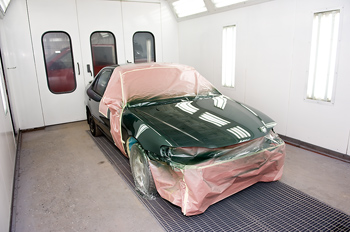
Masking the entire car is the next step. I can’t emphasize enough; this is an extremely important step. Masking can take up to eight hours, but it must be done properly. Place plastic over the windows of the car and secure this plastic with your masking tape.
Be sure to purchase specialized auto masking tape and paper. To avoid getting paint on the underside of the car, set up a curtain or series of sheets or towels all around the car on the underside.
Priming and Painting the Car
Before applying the paint, lay down a layer of primer. If you have a type of primer you prefer to use, stick with that. Otherwise, consider using an epoxy primer, because it seals tightly to the vehicle.
Apply a contrasting color over the top of the primer in order to achieve the best results. This will serve as a reference during the sanding process. Since sanding down the color is easier than the primer itself, you should be able to see any uneven areas.
This “guide coat” should only be misted over the vehicle, not painted directly on. Sand the primer using coarse paper.
Apply a second coat of primer, if all imperfections are taken care of. It may be necessary to add two coats, so that the sanding doesn’t break through to the layer beneath the primer. Remove the masking surrounding the car after waiting for the last coat to dry. Wash any accumulated grit from the surface of the vehicle. Wet-sand it until smooth.
Before the base coat of paint can be applied, dust the car off with dry rags.
Apply the Base Coat of Paint
Apply the base coat, which should go on lightly. Use a spray gun and aim it perpendicular to the area you are spraying, holding the gun about a foot away from the surface. Allow it sufficient time to dry before adding the secondary coat. Let the paint settle for 48 hours, before any final sanding and buffing.
Car Painting Tips
Here are some car painting tips and guidelines to remember when learning how to paint a car:
- When applying acrylic glazing compound, use only a small amount at first. The material takes a long time to dry and can shrink if applied in too large of a quantity.
- If you’re going to do one or the other, take too much time, as opposed to too little, in completing this project. For example, make sure you wait for the paint to dry before adding another coat.
- Consider laying down a double coat of masking tape in case the tape has any small holes or tears.
- Ensure your working environment has proper air ventilation to avoid inhaling fumes.
